Monday, 21 November 2016
Thursday, 17 November 2016
Video: Website - HTML, CSS & JS
For my final post, I created a screen-cast below. This video will show you a website which I created using all the tools we have seen in this blog..
Tuesday, 15 November 2016
JavaScript While Loop & If Statement
In this lesson we will look at loops and if statements. Loops can execute a block of code as long as a specified condition is true. A while loop will loop through the block of code as long as the condition is true. The below is the syntax of a while loop:
while (condition) {
code block to be executed
}
To stop your loop from running infinitely, you must update the condition after every execution of the code. An example of this would be to use a counter. See my example below.

See the screenshots below for an example of this code being used.


while (condition) {
code block to be executed
}
To stop your loop from running infinitely, you must update the condition after every execution of the code. An example of this would be to use a counter. See my example below.

As you can see the loop will run until the condition is no longer through. This is done by using a counter (i++).
The if statement is used to check if a condition is true and you want to run a block of code that might be related to that condition. Use the if statement to specify a block of JavaScript code to be executed if a condition is true. Use the else statement to specify a block of code to be executed if the condition is false. Syntax is below:
if (condition) {
block of code to be executed if the condition is true} else {
block of code to be executed if the condition is false}
block of code to be executed if the condition is true} else {
block of code to be executed if the condition is false}
See the screenshots below for an example of this code being used.


Notice how when I change the value for 'hour', it runs a different block of code which places a different value into 'greeting' each time.
Sunday, 13 November 2016
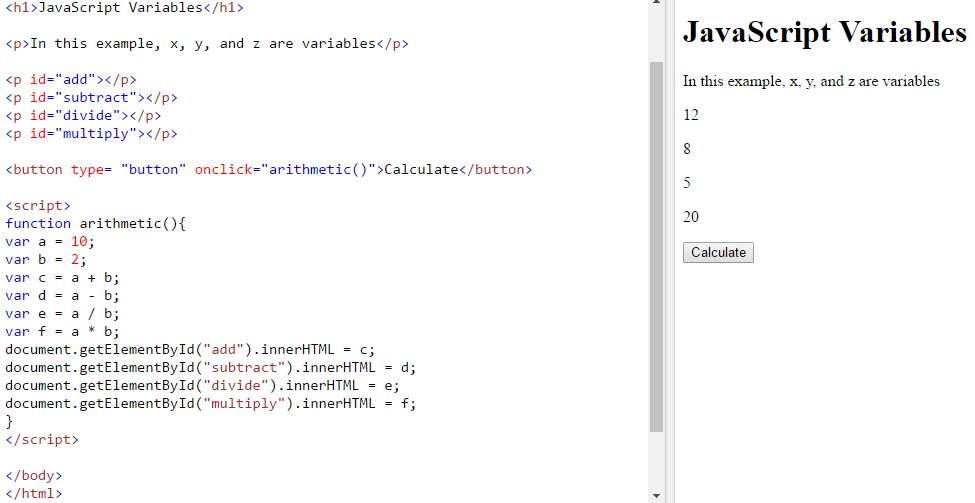
JavaScript Variables & Arithmetic
In JavaScript you can create variables which create a container for storing values. To create a variable, you must declare it by writing 'var', followed by the name of the variable, then the assignment operator, and then the value.


For example: var example = 1;
This would create a variable called 'example' with the value '1'. When deciding the name, you must remember that you are not able to start the name with a number.
Variables can hold different types of values, such as integers, doubles, characters or strings. An integer would be a single number (e.g. 5, 32, -642). A double is a number with a decimal point (e.g. 2.1, 54.66, -0.1). A character is a single character (e.g. d, T, ^) and a string is a list of characters (e.g Hello, WoRlD, hgfds). See below for examples:
The most important rule when working with variables is to never mix the type of variables together. This will make sense when we get in to the arithmetic.
It is possible to do arithmetic with variables such as add (+), subtract (-), divide (/) and multiply (*). When adding variables together, it is best to place the new value into a separate variable.
See an example of these below.

Friday, 11 November 2016
JavaScript Style Properties & Box Model
In this tutorial, we will be learning how to use a number of common style properties, along with learning about the CSS box model. The style properties we will be going through are 'border', 'margin', 'margin-style' and 'background-color'.
We will start with border. A border is useful when you would like to place a border around a certain element. When using a border, you must select the type of the border you want, you will give the value of thickness, type and color.
The next style property is the margin property. When using this, you must declare the size of the margin you want.
When selecting a border, it is possible to give it a certain style by using the border-style property.
The background-color property is used when you would like to add a background color on the element.
See below for examples of all these properties being used:

The CSS Box Model
All HTML elements can be considered as boxes. In CSS, the term "box model" is used when talking about design and layout. The CSS box model is essentially a box that wraps around every HTML element. It consists of: margins, borders, padding, and the actual content. See image below on how to use.

- Content - The content of the box, where text and images appear
- Padding - Clears an area around the content. The padding is transparent
- Border - A border that goes around the padding and content
- Margin - Clears an area outside the border. The margin is transparent
Thursday, 10 November 2016
JavaScript Functions
The final language I will post about is JavaScript. If you have programmed in Java before you will find that JavaScript is pretty similar. JavaScript is used to make your website more interactive for the user.
To begin using JavaScript, you must write learn how to write a function. A function is a method that allows you to alter the webpage. This is done by placing an 'onclick' attribute inside of your HTML element. There is many different types of functions you can write, from very basic to complex functions. Like CSS, your functions can be declared within your HTML page or on an external JavaScript sheet. I have created a very simple function, see below:


To begin using JavaScript, you must write learn how to write a function. A function is a method that allows you to alter the webpage. This is done by placing an 'onclick' attribute inside of your HTML element. There is many different types of functions you can write, from very basic to complex functions. Like CSS, your functions can be declared within your HTML page or on an external JavaScript sheet. I have created a very simple function, see below:


In the first image you can see the code and the webpage when it initially loads. The second image shows you what happens when the button is clicked. When the button is clicked, it runs the function 'displayDateTime'. Within this function I have a statement which looks for the id 'demo'. Once this is found, it places the date and time in the element which has that id. The date and time is found using a pre-defined class called date(). This is a pre-written so you don't have to write it.
Wednesday, 9 November 2016
Video: Website - HTML & CSS
For your viewing, I created a screen-cast below. This video will show you a basic website which I created using all the tools we have seen already.
Sunday, 6 November 2016
CSS Selectors
In CSS, apart from just declaring the element selector, you can declare a specific element. For example, if I have many <p> elements and I only want to select a certain <p> element, I can use a specific selector. There is a number of ways of doing this. The first way is to call on the elements id.
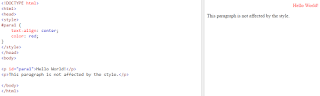

I do this by using the hashtag symbol (#), followed by the id name. See the syntax below:

This will also effect every element containing the id "para1" so be careful!
The second way to declare specific element selector is by calling on the class of the element. This is done by placing a .(dot) in front of the class name. This technique is used when you have a group of elements you would like to change. See example below:

Thursday, 3 November 2016
CSS Basic
In this post I will cover the basics of CSS. As I said in my earlier posts, CSS is used to style your webpage. It gives your webpage a 'prettier' and 'nicer' feel.
To begin, you can create a separate style sheet, or you can just place your CSS inside your HTML within <style> tags. I will be using the <style> tags for my example.
Within these <style> tags, you will simply state which elements you would like to style. After this, you will code what style rules you want to change. These style rules will be held within curly brackets {}. Your first declaration, will be to state what you would like to edit (property), followed by the value. See my example below.

In CSS, there is sometimes different ways to declare values, take 'color' for instance. There is three ways to declare a value for color:
It is also possible to obtain double barrel property tags, for example, some of these include:
To begin, you can create a separate style sheet, or you can just place your CSS inside your HTML within <style> tags. I will be using the <style> tags for my example.
Within these <style> tags, you will simply state which elements you would like to style. After this, you will code what style rules you want to change. These style rules will be held within curly brackets {}. Your first declaration, will be to state what you would like to edit (property), followed by the value. See my example below.

In CSS, there is sometimes different ways to declare values, take 'color' for instance. There is three ways to declare a value for color:
- color: red; - This is declaring it by name
- color: rgb(255,0,0); - This is declaring it by the formula red, blue and green
- color: #FF0000 - This is declaring it by Hex. Value
It is also possible to obtain double barrel property tags, for example, some of these include:
- background-image
- background-repeat
- background-attachment
- background-position
- background-color
- text-align
- text-indent
- text-decoration
Tuesday, 1 November 2016
HTML Lists & Forms
The final part I will cover on HTML is Lists and Forms. As it says on the tin, lists are used to create lists. There are two types of list, un-ordered and ordered. An un-ordered list is used for when it does not matter what order your items are listed in. The ordered list will list your items in ordered numbers.
To create these lists, you will use the <ul> or <ol> tags. Within these tags, you will use the <li> tag to create a List Item. See example below:

Forms are used to give the user a chance to enter some sort of input into your website. This will useful later when we are doing JS as it will enable us to process the users data, but for the meantime we'll just learn how to create forms.
To create a form, you will use the <form> tag. Within these form tags, you will use the <input> tag to create an Input Type. This input type can be anything from a text box to radio buttons. When creating an input, you must state what sort of input it is by using an attribute. e.g. type="text"
See the code and output below for clarification:

Friday, 28 October 2016
HTML Tables & Inner Styling
It is possible to create tables using HTML. The use of this could be to display a timetable on your website. To create a table, you will use the <table> tag. Every table contains Table Rows which can be created using the <tr> tag.
You will include Table Headings within the <tr> tag, denoted by the <th> tag. Using our example, a table header would be used for the days of the week. e.g. Monday, Tuesday, etc.
Following this, you would use the <td> tag. This tag is used for Table Data. An example of this would be the listing on your timetable. e.g. Room 1 - HTML Lab.
As well as using all these tags, you can include a Caption using the <caption> tag.
Although styling is done using CSS in an external style sheet, it is possible to add style rules within your HTML page directly. This is done by using the tag <style> and inputting your style rules within it. You will then call on whatever elements you wish to style, in my case, the table, th, and td elements. You will then state what you wish to style, an example of this would be the border. Once you have decided this, you will state how you would like to style it. All of this will be contained within Curly Brackets {}. Example:
<style>
table{
border: 1px solid black;
}
</style>
See the example below for using all of these tags I just mentioned.

On the image on the left you can see all the tags I talked about above. Note that I have the same number of <th> and <td> in each of the column. My style rules were declared above, within the <head> tag.
 On the image on the right you can see that the <th> tag will display your text in bold, and the <td> tag will display normal text. You can also see the style rules created a border around the table, with the caption being outside the border.
You will include Table Headings within the <tr> tag, denoted by the <th> tag. Using our example, a table header would be used for the days of the week. e.g. Monday, Tuesday, etc.
Following this, you would use the <td> tag. This tag is used for Table Data. An example of this would be the listing on your timetable. e.g. Room 1 - HTML Lab.
As well as using all these tags, you can include a Caption using the <caption> tag.
Although styling is done using CSS in an external style sheet, it is possible to add style rules within your HTML page directly. This is done by using the tag <style> and inputting your style rules within it. You will then call on whatever elements you wish to style, in my case, the table, th, and td elements. You will then state what you wish to style, an example of this would be the border. Once you have decided this, you will state how you would like to style it. All of this will be contained within Curly Brackets {}. Example:
<style>
table{
border: 1px solid black;
}
</style>
See the example below for using all of these tags I just mentioned.

On the image on the left you can see all the tags I talked about above. Note that I have the same number of <th> and <td> in each of the column. My style rules were declared above, within the <head> tag.

Monday, 24 October 2016
HTML Attributes & Basic Styling
Today I will go through HTML Attributes and basic HTML Styling. HTML elements contain attributes, these provide additional information. They are always declared at the start of an opening tag. Each attribute has a Type and a Value.
Some of these attributes include:
 In the right image you can see the code using attribute tags.

To the left you can see the result of these attribute tags outputted to the website.
Aswel as attribute tags, there is some very basic styling you can do using just HTML. These tags include:

Some of these attributes include:
- lang
- title
- href
- src
- width
- height
- alt


To the left you can see the result of these attribute tags outputted to the website.
Aswel as attribute tags, there is some very basic styling you can do using just HTML. These tags include:
- <b>
- <i>
- <u>

Thursday, 20 October 2016
HTML Basics
HTML (HyperText Markup Language), CSS (Cascade Styling Sheet), JS (JavaScript) are the very basic programming languages used to create and build websites. On this blog I will help and aid you to use the tools needed to build a basic website. The easiest way to write code for HTML, CSS or JS is to have a text editor. The text editor you use should be able to edit your code and run it through a browser such as FireFox or Google Chrome. The text editor I would suggest is Notepad++. Please find the link below if you wish to download this editor.
We will first take a look at HTML. HTML uses building blocks known as 'Elements' to create a webpage or certain applications. The most basic element tags would be:
The HTML document itself is contained between the <html> tag, followed by the <body> tag.
Within these tags is where you find the main bulk of your website, which include tags such as your <p> and <h1> to <h6> tags.
Every tag has an opening and a closing tag. This is denoted by a '/' in front of every closing tag. Within the opening and closing tags is where you will type what you want to be outputted on your website.
See the screenshot below for an example.

We will first take a look at HTML. HTML uses building blocks known as 'Elements' to create a webpage or certain applications. The most basic element tags would be:
- <body>
- <html>
- <h1> ... <h6>
- <p>
The HTML document itself is contained between the <html> tag, followed by the <body> tag.
Within these tags is where you find the main bulk of your website, which include tags such as your <p> and <h1> to <h6> tags.
Every tag has an opening and a closing tag. This is denoted by a '/' in front of every closing tag. Within the opening and closing tags is where you will type what you want to be outputted on your website.
See the screenshot below for an example.
Download link for Notepad++:
Subscribe to:
Posts (Atom)